I love baking, and when fresh raspberries are around, I always think of delicious raspberry cookies. These sweet treats are perfect for any time you want something easy or a bit special.
Today, I’m sharing four of my favorite raspberry cookie recipes. You’ll find something here for every craving, from soft and chewy to delightfully stuffed raspberry goodness.
Jump to Recipe:
- 1. Raspberry Cheesecake Stuffed Cookies
- 2. Raspberry Chocolate Oatmeal Cookies
- 3. Raspberry Swirl Cookies
- 4. Raspberry White Chocolate Chip Cookies
Raspberry Cheesecake Stuffed Cookies
These raspberry cheesecake cookies are truly special. They have a creamy, tangy cheesecake filling hidden inside a soft cookie, with bright raspberry flavor.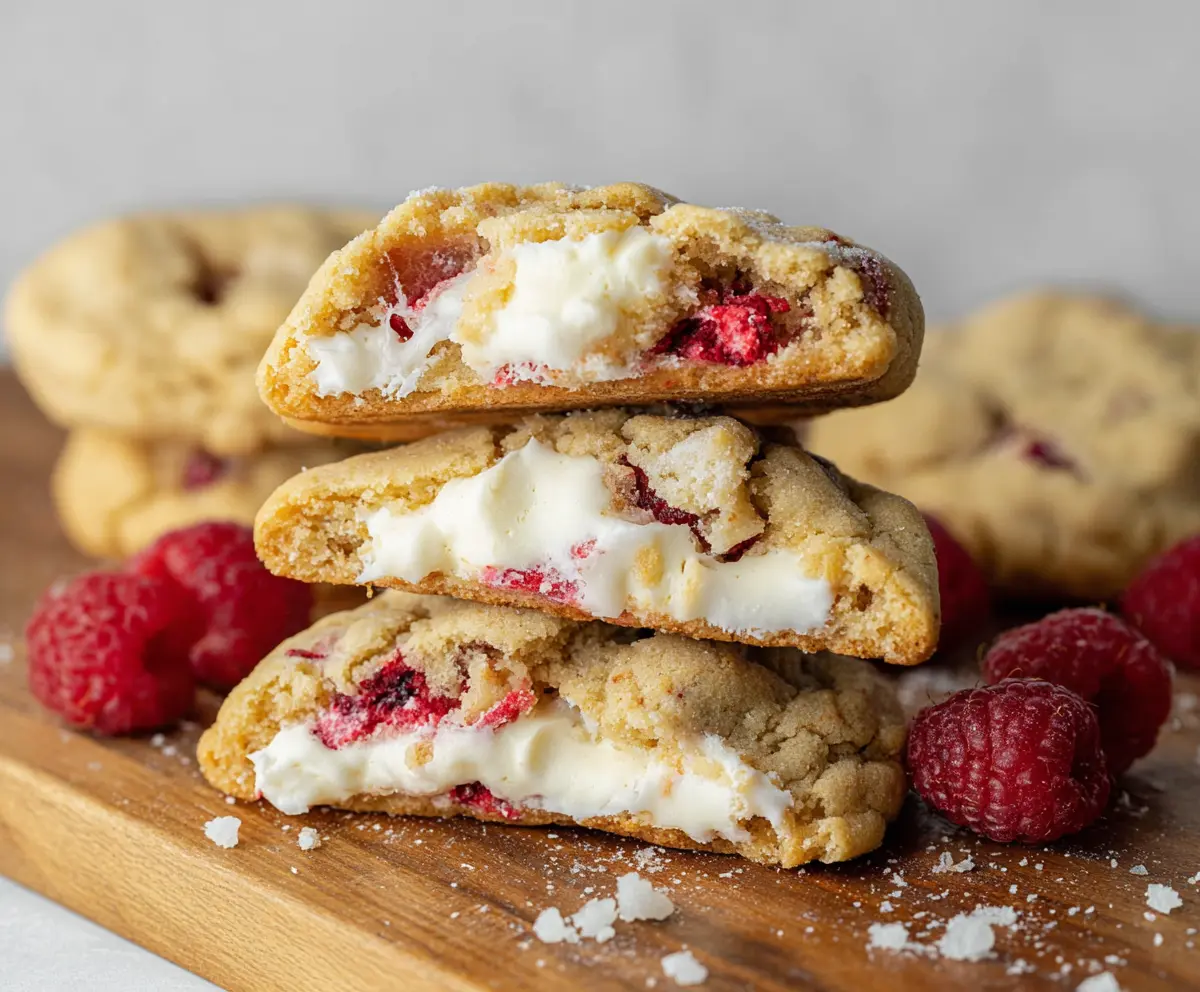
Key Ingredients & Tips for Stuffed Raspberry Cookies
- Softened Cream Cheese: This is key for a smooth, easy-to-mix cheesecake filling. Make sure it’s at room temperature before you start.
- Chilled Dough: Chilling the cookie dough helps it hold its shape around the filling. It also prevents the cookies from spreading too much while baking.
What You Need for Raspberry Cheesecake Cookies
- All-purpose flour
- Granulated sugar
- Unsalted butter
- Cream cheese
- Fresh raspberries
⏱️ Time: 40 mins (plus chilling)🍽️ Yields: 12 cookies
How to Make Raspberry Cheesecake Stuffed Cookies
Step 1: Make the Raspberry Filling
Mix softened cream cheese with a little sugar until smooth. Gently stir in some mashed fresh raspberries. Place small spoonfuls of this mixture onto parchment paper and freeze them while you prepare the cookie dough.
Step 2: Bake the Stuffed Cookies
Prepare your favorite simple cookie dough. Take a small amount of dough, flatten it in your palm, place a frozen raspberry cheesecake ball in the center, and carefully wrap the dough around it to seal. Bake until golden brown.
📝 Final Note
Let these cookies cool completely to allow the creamy cheesecake filling to set perfectly before you take a bite!
Raspberry Chocolate Oatmeal Cookies
These oatmeal cookies are packed with wholesome oats, rich chocolate chips, and bursts of fresh raspberries. They’re chewy, satisfying, and full of great flavors.
Key Ingredients & Tips for Raspberry Oatmeal Cookies
- Rolled Oats: Using old-fashioned rolled oats gives these raspberry cookies a wonderful chewy texture. Quick oats can work, but the texture will be slightly different.
- Don’t Overmix: Mix the dough just until combined, especially after adding the dry ingredients. Overmixing can make your cookies tough, so be gentle.
What You Need for Oatmeal Cookies
- Rolled oats
- All-purpose flour
- Unsalted butter
- Brown sugar
- Chocolate chips
- Fresh raspberries
⏱️ Time: 25 mins🍽️ Yields: 24 cookies
How to Make Raspberry Chocolate Oatmeal Cookies
Step 1: Mix the Dough
Cream softened butter and sugars together until light and fluffy, then add eggs and vanilla extract. In a separate bowl, mix your dry ingredients. Gradually add the dry mixture to the wet mixture, then fold in the rolled oats, chocolate chips, and gently, the fresh raspberries.
Step 2: Bake and Cool Cookies
Drop spoonfuls of dough onto your prepared baking sheets, leaving some space between each cookie. Bake them until the edges are golden and the centers look set. Let them cool on the pan for a few minutes before moving them to a wire rack.
📝 Final Note
For extra raspberry flavor, you can gently press a few extra raspberry pieces on top of the cookies right after they come out of the oven!
Pretty Raspberry Swirl Cookies
These raspberry swirl cookies are so pretty with their vibrant pink and white patterns. They are soft, buttery, and have a lovely raspberry flavor in every bite.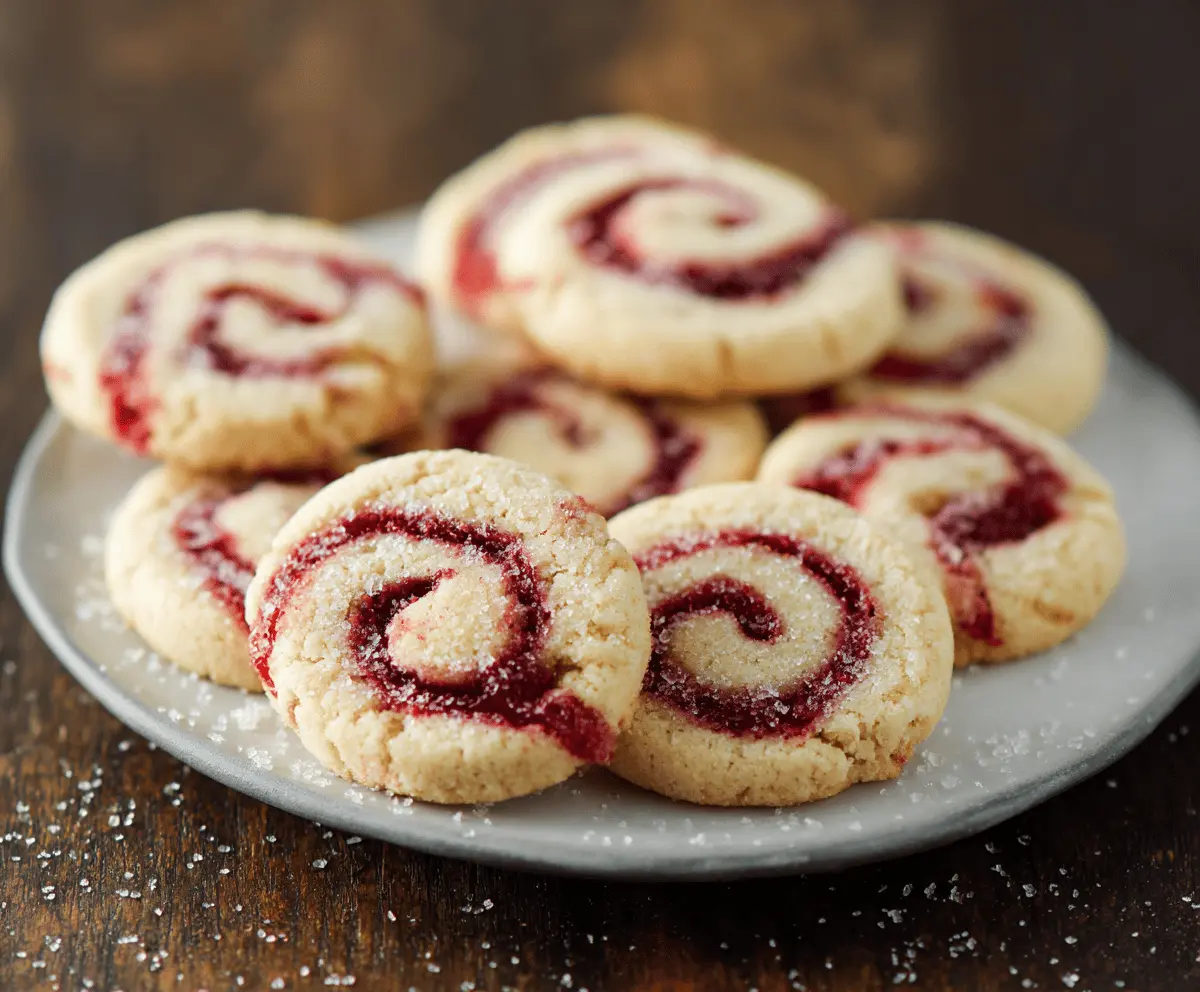
Key Ingredients & Tips for Raspberry Swirl Cookies
- Thick Raspberry Puree: Use a thick raspberry puree, either store-bought or homemade by cooking down fresh raspberries and straining. This helps create a defined, beautiful swirl.
- Work Quickly: When you layer and roll the two doughs together, work a bit quickly so the dough doesn’t get too warm and sticky. This keeps the layers distinct.
What You Need for Swirl Cookies
- All-purpose flour
- Unsalted butter
- Granulated sugar
- Egg
- Raspberry jam or puree
- Vanilla extract
⏱️ Time: 45 mins🍽️ Yields: 30 cookies
How to Make Raspberry Swirl Cookies
Step 1: Prepare Two Doughs
Make a simple butter cookie dough. Divide this dough in half. Into one half, mix in your raspberry puree to create a lovely pink dough. Keep both the plain and raspberry doughs chilled until you are ready to use them.
Step 2: Swirl and Bake
On a lightly floured surface, roll out each dough into a rectangle of the same size. Carefully place the raspberry dough on top of the plain dough, gently pressing them together. Roll them up tightly like a log. Slice the log into cookies and bake until lightly golden.
📝 Final Note
For the best swirl appearance and easy handling, make sure your doughs are well chilled before you roll them out.
Raspberry White Chocolate Chip Cookies
These cookies combine the bright taste of raspberries with sweet white chocolate chips. They are soft, chewy, and a delightful treat for anyone who loves fruit and chocolate.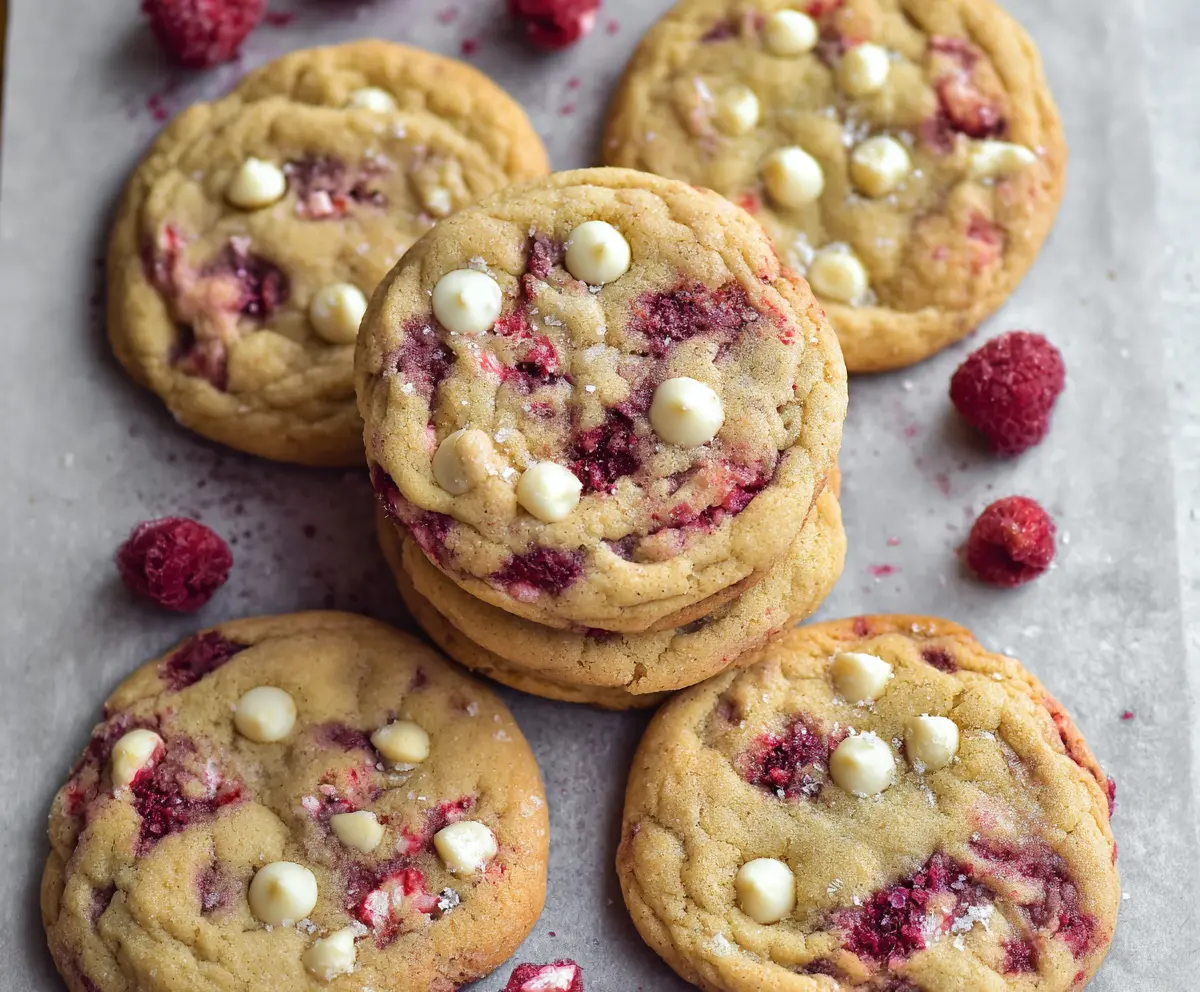
Key Ingredients & Tips for White Chocolate Raspberry Cookies
- Frozen Raspberries: If using frozen raspberries, do not thaw them completely before adding to the dough. This helps prevent them from bleeding too much color into your cookie dough.
- Good Quality White Chocolate: Using good quality white chocolate chips makes a big difference in the flavor and how beautifully they melt and taste in your cookies.
What You Need for White Chocolate Chip Cookies
- All-purpose flour
- Unsalted butter
- Granulated sugar
- Brown sugar
- Eggs
- White chocolate chips
- Fresh or frozen raspberries
⏱️ Time: 30 mins🍽️ Yields: 20 cookies
How to Make Raspberry White Chocolate Chip Cookies
Step 1: Mix Wet and Dry Ingredients
Cream softened butter with both granulated and brown sugars until light and fluffy. Beat in the eggs one at a time, then add vanilla extract. In a separate bowl, whisk together your flour, baking soda, and salt. Gradually add the dry mixture to the wet ingredients until just combined.
Step 2: Add Mix-ins and Bake
Gently fold in the white chocolate chips and raspberries into the cookie dough. Drop spoonfuls of dough onto your prepared baking sheets, leaving a little space between them. Bake until the edges are lightly golden and the centers are set.
📝 Final Note
If your cookies look a little pale after baking, you can gently press a few extra white chocolate chips and raspberry pieces on top right after they come out of the oven for a pretty look.