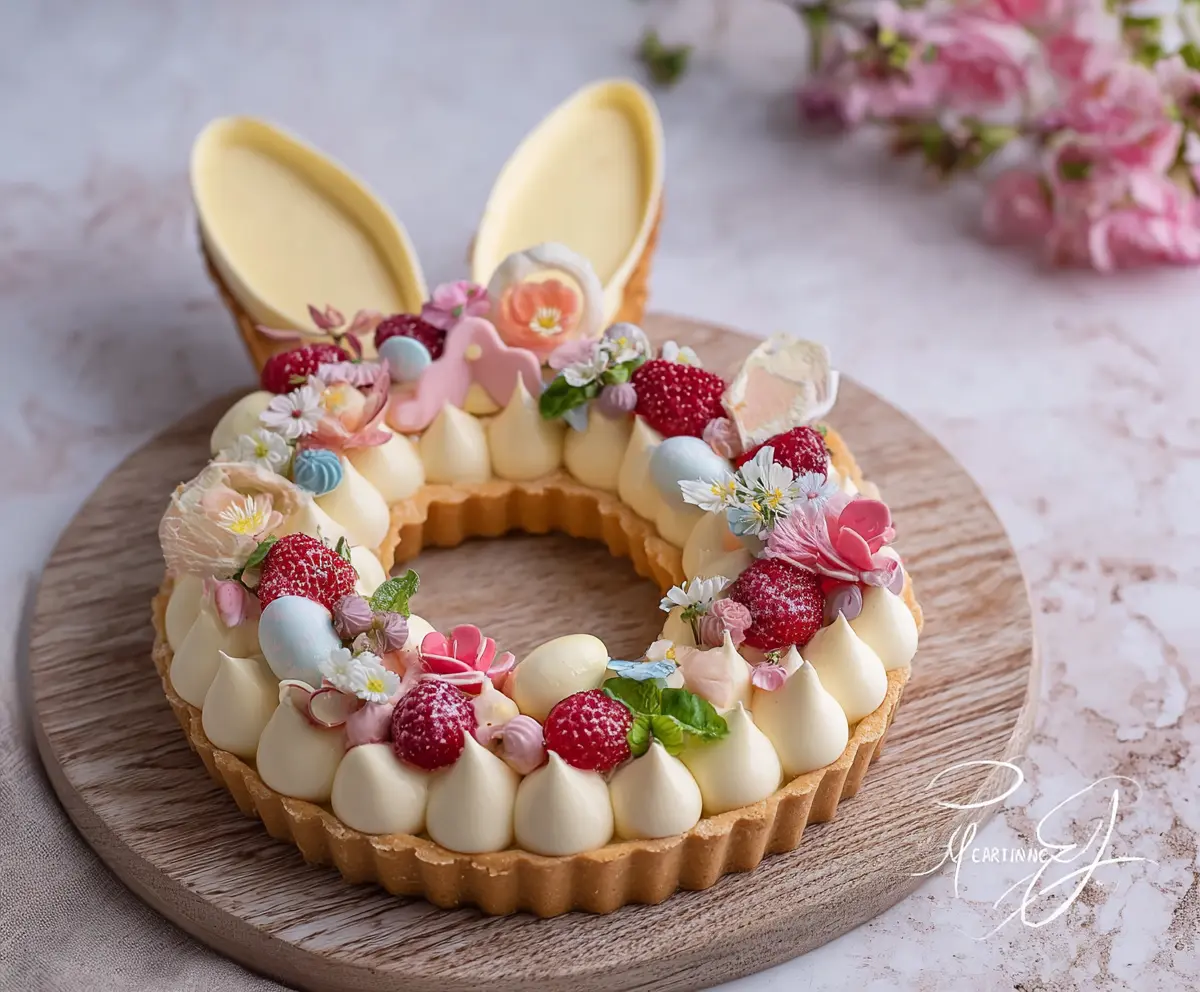
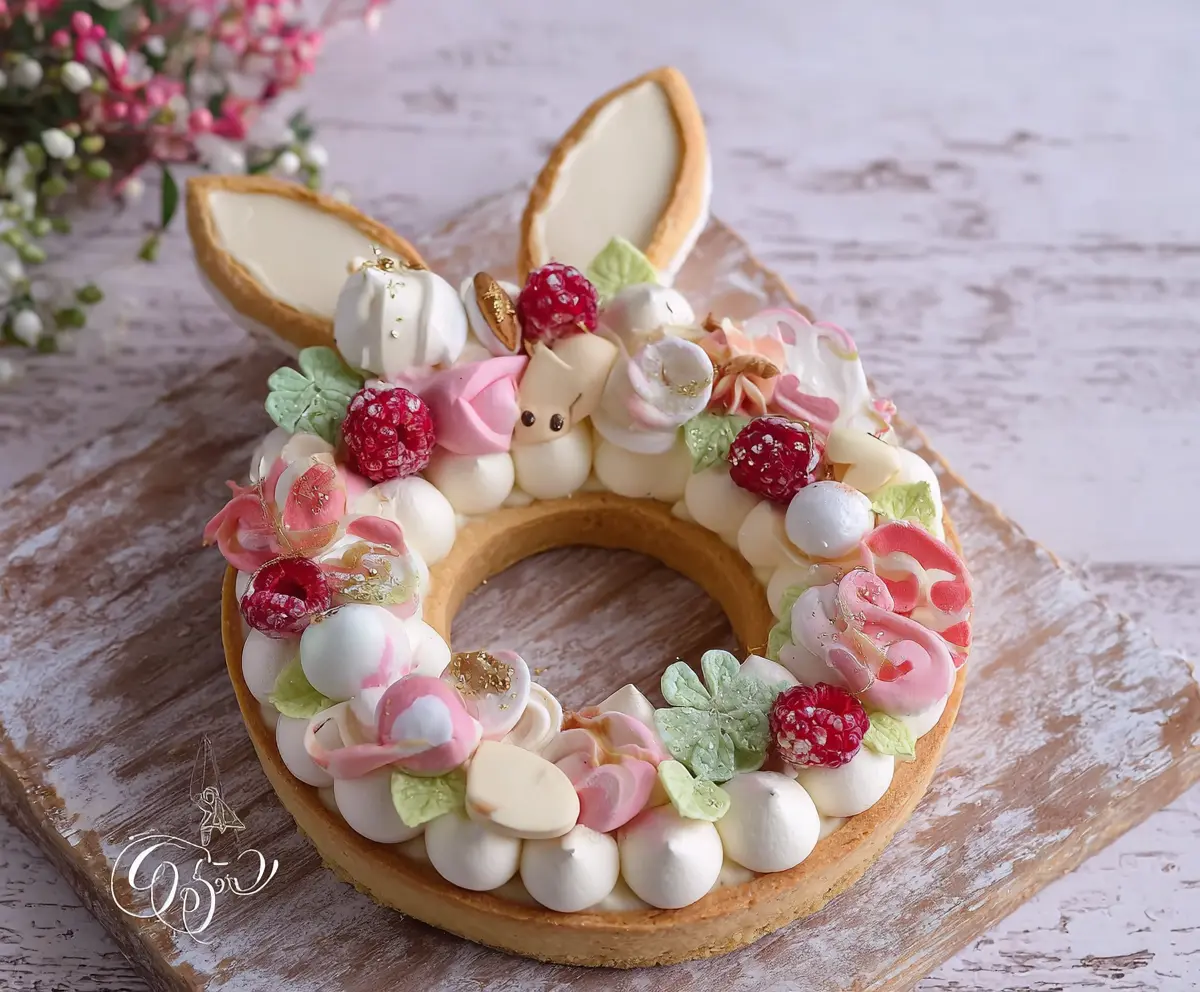
This fun Easter Bunny Cream Tart is a treat that’s as cute as it is delicious! With a fluffy cream filling and a buttery crust, it’s sure to make everyone smile.
Honestly, I can’t resist the adorable bunny design on top. It’s the perfect dessert to brighten up any Easter gathering. Plus, making it is a great way to bond with kids in the kitchen!
Key Ingredients & Substitutions
All-purpose flour: Essential for the tart crust. If you need a gluten-free option, try using a gluten-free flour blend that measures 1:1. I’ve had success with almond flour for a nuttier flavor as well.
Butter: Both the unsalted butter for the crust and softened butter for the pastry cream add richness. If you’re dairy-free, coconut oil can work, though it may slightly change the flavor.
Eggs: The egg in the crust helps bind the ingredients. For a vegan substitute, use a flax egg (1 tablespoon ground flaxseed mixed with 3 tablespoons water). If you’re not vegan but want to skip the egg, use applesauce – about 1/4 cup works well.
Vanilla extract: This ingredient enhances the flavors in both the crust and cream filling. Pure vanilla extract is best for flavor, but you can use vanilla essence if you need a budget-friendly alternative.
Cream cheese: If you’re opting for the cream cheese mousse, choose a full-fat option for the best texture. Greek yogurt can be used as a lighter substitute but may give a tangier flavor.
Fresh fruit: While strawberries and raspberries look beautiful, feel free to use other seasonal fruits like blueberries or peaches. They all add freshness!
How Do I Achieve a Flaky Tart Crust?
The tart crust needs attention to achieve that perfect flakiness. It’s crucial to keep the butter cold – this helps creates those delicate layers. Here are my tips:
- Use your fingers to rub the butter into the flour until it looks like coarse crumbs, but don’t overwork it. If the butter melts, the crust won’t be flaky!
- Chill the dough well in plastic wrap and then again after shaping it in the pan. Chilling firms up the butter, ensuring the crust maintains its shape during baking.
- Blind bake the shell with weights to prevent bubbling. This method helps the crust cook evenly and stay in shape!
What’s the Best Way to Pipe the Cream Filling?
Piping the cream filling creates a beautiful look and texture. To do this successfully:
- Transfer the filling into a piping bag fitted with a large round tip for smooth drops. You don’t have to get fancy; just focus on even spacing.
- Hold the piping bag at a 90-degree angle above the crust, applying gentle pressure to form peaks. Start from the edge and work your way inward.
- Keep a steady hand and practice if you can. If it feels overwhelming, you can also spoon the filling into the shell for a more rustic look!
How to Make an Easter Bunny Cream Tart
Ingredients You’ll Need:
For the Tart Crust:
- 250g all-purpose flour
- 125g unsalted butter, cold and cubed
- 90g powdered sugar
- 1 large egg
- 1 tsp vanilla extract
- Pinch of salt
For the Cream Filling (vanilla pastry cream or cream cheese mousse):
- 250ml whole milk
- 3 large egg yolks
- 70g granulated sugar
- 25g cornstarch
- 1 tsp vanilla extract
- 150g unsalted butter, softened (for pastry cream)
- or alternatively for cream cheese mousse:
- 200g cream cheese, softened
- 200ml heavy cream, whipped
- 50g powdered sugar
- 1 tsp vanilla extract
For Decoration:
- Fresh strawberries or raspberries
- Edible flowers (such as daisies, pansies, or cherry blossoms)
- Edible gold leaf or sugar decorations in pastel colors
- Easter-themed meringue or sugar decorations (pink bunny shapes, pastel-colored eggs)
- Fresh mint leaves
- White chocolate for making bunny ears (melted and shaped in molds)
- Powdered sugar for dusting
How Much Time Will You Need?
This delightful tart takes about 30 minutes to prepare, plus 1.5 hours for chilling and baking. After the initial prep and baking, you’ll have a delicious and beautiful dessert ready to impress your guests!
Step-by-Step Instructions:
1. Preparing the Tart Crust:
In a bowl, mix the flour, powdered sugar, and a pinch of salt. Add the cold cubed butter and rub it between your fingers until it looks like coarse crumbs. Next, add the egg and vanilla extract, mixing gently until the dough starts to come together—be careful not to overwork it!
Shape the dough into a disc, wrap it in plastic, and refrigerate for at least 1 hour. After chilling, roll out the dough to fit a tart pan with a fluted edge and a central hole to create the ring shape. Line the tart pan with the dough, prick the base with a fork, and chill again for another 30 minutes.
Preheat your oven to 175°C (350°F). Bake the tart shell blind using baking weights or dried beans for about 15 minutes. Once done, remove the weights and bake for another 10 minutes until it’s golden brown. Let it cool completely on a wire rack.
2. Preparing the Cream Filling (Pastry Cream Version):
Start by heating the milk in a saucepan until it’s just boiling. In a separate bowl, whisk the egg yolks, sugar, and cornstarch until smooth. Gradually pour the hot milk into the egg mixture while whisking constantly. Return this mixture to the pan and cook over medium heat, stirring continuously until it thickens.
Take it off the heat and mix in the vanilla extract. Pour into a bowl, cover it with plastic wrap touching the surface to prevent a skin, and chill until cool. Once cooled, beat in the softened butter until it’s smooth and creamy.
Alternatively, for a cream cheese mousse:
Beat the cream cheese with powdered sugar and vanilla until smooth. Whip the heavy cream until you see stiff peaks, then gently fold it into the cream cheese mixture until well combined.
3. Assembling the Tart:
Transfer your cream filling into a piping bag fitted with a large round tip. Pipe smooth, generous dollops evenly around the tart shell to create a lovely ring of peaks.
4. Decorating the Tart:
Top your cream with fresh raspberries or strawberries, and place edible flowers delicately between the cream peaks. For a festive touch, add pastel-colored sugar decorations like miniature eggs and bunny shapes. Insert fresh mint leaves for an extra pop of color and flavor. Dust lightly with powdered sugar and secure white chocolate bunny ears standing upright at the back of the tart.
5. Serving:
Present your beautiful tart on a decorative wooden board or plate. Serve it chilled to allow the cream to maintain its delightful texture and freshness!
Enjoy your elegant, festive Easter Bunny Cream Tart!
Can I Use Store-Bought Tart Crust Instead?
Absolutely! Using a store-bought tart crust can save you time. Just ensure it’s baked in line with the package instructions, then proceed with filling and decorating as instructed.
How Do I Prevent the Cream from Getting Too Runny?
To keep the cream from becoming runny, make sure to chill the filling thoroughly before piping it into the tart. If using pastry cream, ensure it thickens enough during cooking. Whipped cream should be folded gently into the cream cheese mixture to maintain its structure.
Can I Make the Tart Ahead of Time?
Yes! You can prepare the tart crust and filling a day in advance. Assemble the tart the day you plan to serve it to keep the cream fresh. Store the baked crust covered at room temperature and the filling in the refrigerator until ready to use.
How Should I Store Leftovers?
Store any leftover tart in an airtight container in the refrigerator for up to 3 days. If possible, add fresh decorations just before serving to maintain their appearance and freshness.