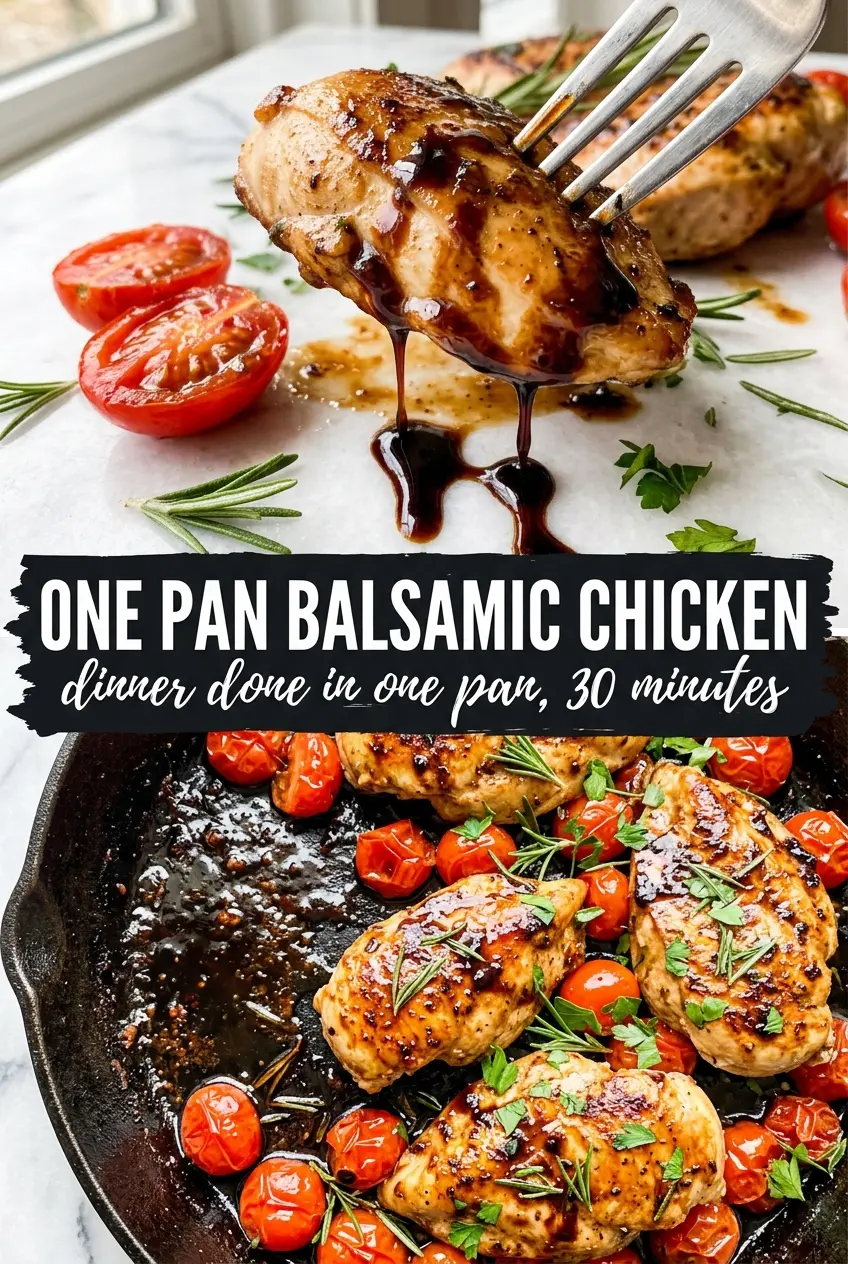
Golden chicken thighs in a balsamic glaze are one of those skillet dinners that looks like you worked a lot harder than you did. The skin turns crisp and deeply browned first, then the sauce cooks down around the chicken until it’s glossy, tangy, and just sweet enough to cling to every bite. Add the burst cherry tomatoes and you get little pockets of juice that keep the whole pan from tasting heavy.
What makes this version work is the order. The chicken gets a real sear before any liquid goes in, which builds flavor and keeps the skin from going soft too soon. Then the balsamic, honey, and broth reduce together in the same pan, so you’re not making a separate sauce that has to be fussed over at the end. The butter goes in last to round out the sharp edges without making the glaze greasy.
Below, I’ve included the small details that matter here: how to keep the sauce from getting too thin, when the chicken is actually done, and the one swap I’d use if you need to work with what’s already in the fridge.
The balsamic reduced into a shiny glaze faster than I expected, and the chicken skin stayed crisp even after I spooned the sauce over it. The tomatoes broke down just enough to sweeten everything without turning mushy.
Save this one-pan balsamic chicken for the nights when you want crisp thighs, a sticky glaze, and barely any cleanup.
The Sear Is What Keeps the Glaze from Turning Flat
The biggest mistake with balsamic chicken is rushing past the sear and expecting the sauce to carry the whole dish. It won’t. You need that deep brown crust on the chicken skin and the browned bits in the skillet because they give the glaze its backbone. Without them, the balsamic tastes sharp and thin instead of rich and concentrated.
Keep the heat up when the chicken goes in skin-side down, and leave it alone long enough for the skin to render and release from the pan. If it sticks, it’s not ready yet. Once it lifts cleanly and looks deeply golden, you’re in the right place to build the sauce.
What the Balsamic, Honey, and Butter Are Each Doing

- Bone-in, skin-on chicken thighs — These stay juicier than boneless cuts and give you the crisp skin that makes the skillet feel special. You can use boneless thighs, but you’ll lose some of that roasted flavor and the sauce will finish a little faster.
- Balsamic vinegar — This is the flavor anchor, so use one you’d actually taste on its own. Cheap balsamic works here because it’s being reduced with honey and broth, but if yours is extremely thin and harsh, the glaze will need a little extra time on the stove.
- Honey — It softens the vinegar’s edge and helps the sauce turn lacquered instead of sour. Maple syrup can work in a pinch, though it brings a different flavor and browns a little faster.
- Chicken broth — This keeps the sauce from reducing into a sticky sugar bomb too quickly. Stock is fine, but broth usually gives a cleaner savory note without overpowering the balsamic.
- Butter — Stirred in at the end, it gives the glaze a silky finish and helps it cling to the chicken. Add it after the heat comes down or it can split and lose that polished look.
- Cherry tomatoes and garlic — The tomatoes blister and collapse into the sauce, while the whole garlic cloves turn sweet and mellow. Minced garlic would burn before the sauce finishes, so whole cloves are the right call here.
Building the Skillet So the Sauce Reduces Instead of Burning
Season and Sear the Chicken First
Season the chicken generously on both sides, then place it skin-side down in hot olive oil. You want to hear a steady sizzle right away; if the pan is too cool, the skin steams and turns rubbery. Let it cook long enough to become deeply golden and crisp before flipping, and don’t move it around while it’s searing. That still time is what gives you a clean release and the best crust.
Let the Tomatoes and Garlic Wake Up in the Pan
After you remove the chicken, add the whole garlic cloves and cherry tomatoes. They should hit the pan and start to blister, not sit there quietly. Two minutes is enough for the garlic to take on color and the tomatoes to split at the skin. If the garlic is already dark before the liquid goes in, the heat is too high and it needs to come off the burner for a minute.
Reduce the Sauce Before the Chicken Goes Back In
Pour in the balsamic vinegar, honey, and chicken broth, then scrape the skillet well. Those browned bits dissolve into the glaze and keep the sauce from tasting one-note. Bring it to a boil first so the mixture starts reducing immediately, then lower the heat once the chicken returns. If you skip that initial boil, the sauce can stay watery for too long and the chicken overcooks before the glaze thickens.
Finish with Butter and Basil
When the chicken reaches 165°F and the sauce coats a spoon in a thin glossy layer, pull the pan off the heat. Stir in the butter until it melts into the glaze, then add the basil at the end so it stays bright. If the sauce looks too loose, let the chicken rest in the pan for a minute or two and it will tighten up as it sits. That last pause matters more than people think.
Three Ways to Bend This Recipe Without Breaking It
Make It Dairy-Free
Skip the butter and finish the sauce with a teaspoon of olive oil instead. You won’t get the same silky edge, but the glaze will still reduce beautifully and stay clean-tasting. If you want a little more richness, let the sauce cook down an extra minute before the chicken goes back in.
Use Boneless Chicken Thighs or Breasts
Boneless thighs work well and shave a few minutes off the cooking time. Chicken breasts can be used, but they dry out faster, so pull them as soon as they hit temperature and don’t let them sit in the pan too long while the sauce finishes. The flavor stays the same, but the skinless version won’t give you that crisp top layer.
Make It Gluten-Free
This recipe is naturally gluten-free as written, as long as your broth is certified gluten-free. That matters more than people expect, because some broths sneak in wheat-based additives. Nothing else needs adjusting.
Add a Little Heat
A pinch of red pepper flakes with the balsamic gives the glaze a gentle back-end heat that plays well with the honey. Don’t add too much or it can drown out the tomatoes. A light hand keeps the sauce balanced and still lets the balsamic stay front and center.
Storage and Reheating
- Refrigerator: Store in an airtight container for up to 3 days. The skin won’t stay crisp, but the flavor gets even deeper.
- Freezer: Freezes well for up to 2 months if you remove the basil before freezing. Thaw overnight in the fridge so the sauce doesn’t separate.
- Reheating: Reheat gently in a covered skillet over low heat with a splash of broth. High heat can make the balsamic glaze sticky on the bottom before the chicken warms through.
Answers to the Questions Worth Asking
One Pan Balsamic Chicken
Ingredients
Equipment
Method
- Season the chicken thighs generously on both sides with salt, pepper, garlic powder, and Italian seasoning.
- Press the seasoning into the skin so it adheres for crisp browning.
- Heat the olive oil in a large cast iron skillet over medium-high heat until shimmering.
- Place chicken skin-side down and sear for 7-8 minutes until the skin is deeply golden and crispy; do not move the thighs during searing.
- Flip the chicken and sear for 3 more minutes, then remove to a plate.
- Add whole garlic cloves and cherry tomatoes to the skillet and cook for 2 minutes until the tomatoes begin to blister.
- Pour in the balsamic vinegar, honey, and chicken broth, then stir and bring to a boil while scraping up browned bits from the bottom of the pan.
- Return the chicken to the skillet skin-side up and cook over medium heat for 12-15 minutes until the chicken reaches 165°F.
- Continue cooking until the balsamic sauce reduces to a thick glaze that clings to the chicken.
- Stir in the butter until melted, then scatter fresh basil over the top.
- Serve straight from the skillet while the glaze is dark, glossy, and bubbling at the edges.