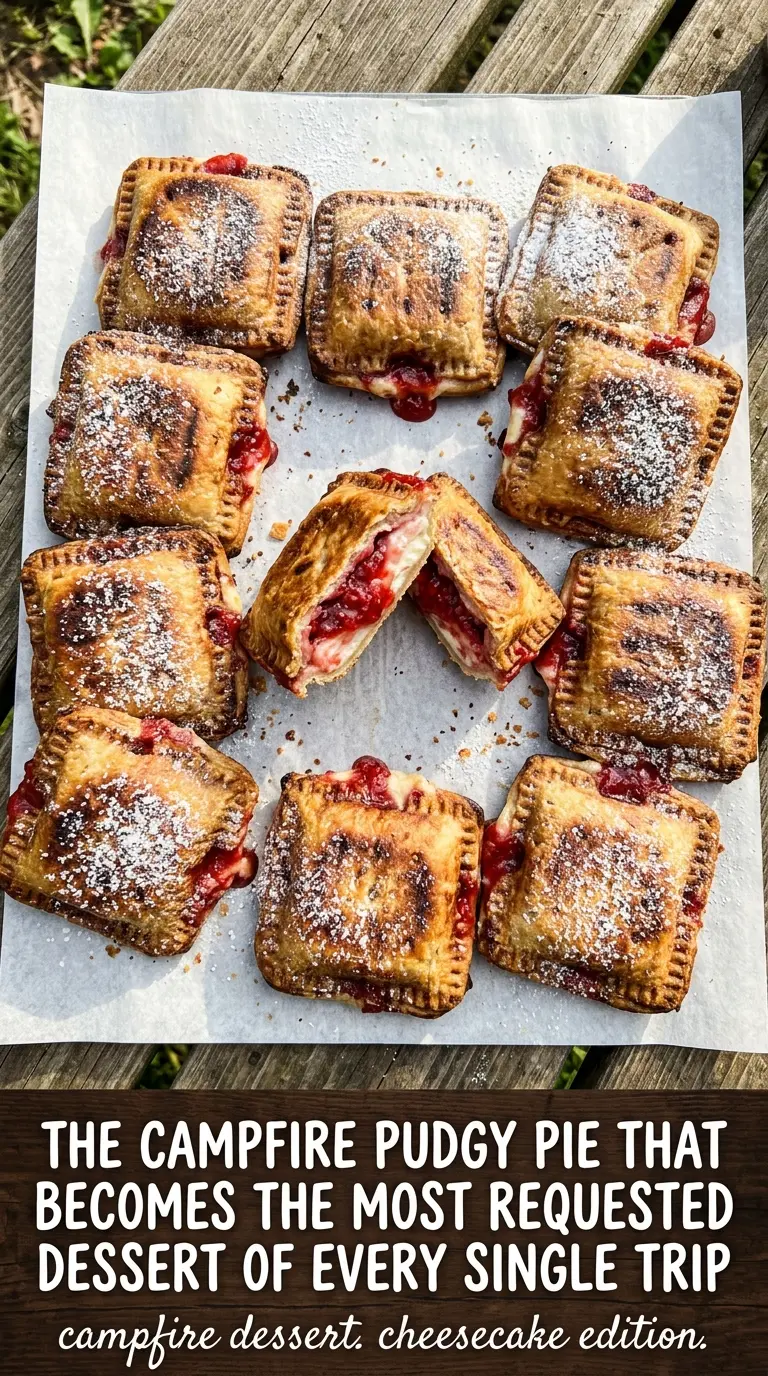
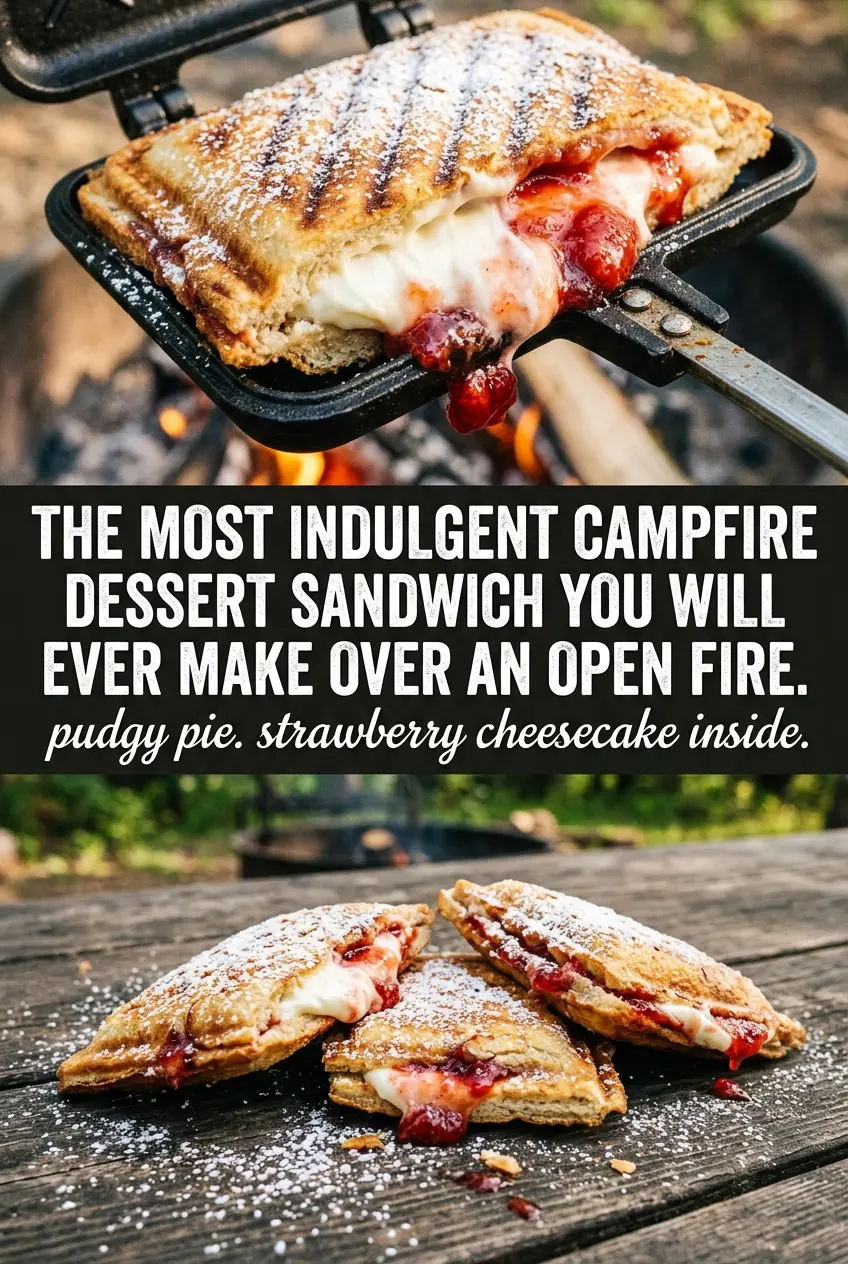
Golden toasted bread, tangy cream cheese, and warm strawberry filling turn a pie iron into a dessert that disappears fast around a campfire. The outside gets crisp and buttery while the center stays soft and molten, which is exactly what makes a pudgy pie worth making in the first place.
This version works because the filling is kept simple and balanced. Softened cream cheese whips smooth with powdered sugar and vanilla, so it spreads without tearing the bread, and the strawberry pie filling gives you that glossy, jammy center without needing extra thickeners. Butter on the outside matters here too; it helps the bread toast evenly and keeps the crust from turning dry over the coals.
Below you’ll find the small details that keep the filling from leaking, the bread from burning, and the whole sandwich from collapsing when you open the pie iron. A couple of the variations are handy if you’re cooking for kids, avoiding dairy, or working with what you packed.
The cream cheese layer stayed smooth and the strawberry filling got hot without soaking the bread. Mine came out crisp on the outside and gooey in the middle after about 3 minutes per side.
Save this Strawberry Cheesecake Pudgy Pie for your next campfire dessert night when you want crisp bread, warm strawberry filling, and a creamy center.
The Trick to Keeping the Filling Inside the Pie Iron
The biggest mistake with pudgy pies is overfilling them. Strawberry pie filling looks harmless going in, but it turns loose and hot fast, and if you pile it too high it pushes out the seam before the bread has a chance to toast and seal. A thin, even layer of cream cheese mixture and a modest spoonful of fruit filling gives you a cleaner release and a better ratio in every bite.
Another thing that matters here is the bread. Standard white sandwich bread works best because it compresses easily and seals around the edges without cracking. Thicker bread can be used, but it takes longer to toast and tends to split before the center finishes heating through.
- Cream cheese — Full-fat cream cheese gives the filling body and that cheesecake tang. Low-fat cream cheese will work, but it softens faster and can get a little looser once heated.
- Powdered sugar — This dissolves instantly and keeps the filling smooth. Granulated sugar stays gritty here, especially since the filling isn’t baked long enough to melt it completely.
- Strawberry pie filling — This is what gives you the glossy, spoonable center. Jam can work in a pinch, but it’s thicker and less juicy, so the middle tastes more like toast with jam than cheesecake filling.
- White bread — Soft sandwich bread is the right texture for a pie iron. It browns evenly and seals around the edges better than artisan bread, which can tear or leave gaps.
What Each Ingredient Is Actually Doing in Pie Iron Filling
- Filling ingredient (jam, fruit, chocolate, savory) — The filling should be thick enough to hold its shape. Runny fillings leak out as the iron heats.
- Thickener (if needed for wet fillings) — Fruit or other wet fillings need a binder. Cornstarch or tapioca thickener keeps fillings from seeping.
- Filling quantity (modest, not overstuffed) — Overstuffed pies leak filling that burns on the grill. Leave room for the bread to seal around the filling.
- Bread or pastry base (sturdy enough to hold) — The bread must be thick enough to contain the filling without tearing. Thin bread falls apart under pressure.
- Edges sealed properly (pressed firmly) — The seal is what keeps the filling inside. Press the edges hard enough to create a tight seal that won’t open under heat.
- Pie iron preheated (so filling cooks, not just bread) — A cold pie iron lets the bread burn before the filling cooks. Preheat on the fire briefly.
- Even heat application (turn occasionally) — Both sides need equal cooking time. Turning ensures even browning and proper filling cooking.
- Test for doneness (filling should be hot, not cold in center) — Press gently in the center to check if it’s hot. If filling is still cool, close it and cook longer.
Building the Pudgy Pie So It Browns Before It Burns
Mixing the Cheesecake Base
Beat the softened cream cheese, powdered sugar, and vanilla until the mixture is completely smooth, with no little lumps hiding at the bottom of the bowl. If the cream cheese is still cold, you’ll end up with streaks that don’t spread well and can tear the bread when you try to smear them on. The filling should look fluffy and thick, not runny.
Buttering and Filling the Bread
Spread butter on one side of each slice all the way to the edges, because the border is what crisps first against the hot iron. Lay one slice in the pie iron butter-side down, then spread on the cream cheese mixture and top with strawberry filling. Keep the filling away from the edge by about a half inch so it has room to puff without leaking out the seam.
Cooking Over the Coals
Close the pie iron and cook over hot coals, not open flame, for about 3 to 4 minutes per side. You want steady heat that slowly toasts the bread and warms the center; direct flames scorch the outside before the filling heats through. Open the iron only when the bread looks deep golden and you can smell the butter turning nutty.
Finishing and Serving
Let the pudgy pie rest for 2 minutes before cutting or biting in. That short pause lets the filling settle, which keeps it from flooding out the second you open the iron. A dusting of powdered sugar on top makes it look finished and adds just enough extra sweetness to balance the tangy cream cheese.
Make It with Blueberry or Cherry Pie Filling
Swap the strawberry pie filling for blueberry or cherry and keep everything else the same. You’ll get a sharper, more old-fashioned campfire pie flavor, and the cream cheese base still gives the fruit a cheesecake feel. Cherry is a little sweeter and messier, while blueberry tends to hold its shape a bit better inside the iron.
Dairy-Free Version
Use a dairy-free cream cheese and plant-based butter, then cook the same way. The texture will be a little softer and the filling won’t have quite the same tang, but the result still tastes like a warm fruit-and-cream dessert. Chill the dairy-free filling for a few minutes before assembling if it feels too loose.
Use Cinnamon Sugar Instead of Powdered Sugar on Top
Skip the final dusting of powdered sugar and shake on a little cinnamon sugar instead. It adds a warmer, toastier finish that works especially well if you’re serving these with coffee at brunch or making them for cooler-weather camping. The pie iron filling stays the same, but the top tastes more like a baked pastry than a dessert sandwich.
Storage and Reheating
- Refrigerator: Store leftovers wrapped tightly for up to 2 days. The bread softens as it sits, so expect less crispness after chilling.
- Freezer: Freezing isn’t ideal for this one because the cream cheese and fruit filling can turn watery when thawed. If you must freeze it, wrap it well and reheat from frozen rather than thawing first.
- Reheating: Warm it in a dry skillet over low heat or in a toaster oven until the bread crisps again. The common mistake is using high heat, which burns the bread before the center loosens up.
Questions I Get Asked About This Recipe
Strawberry Cheesecake Pudgy Pie
Ingredients
Equipment
Method
- Mix softened cream cheese, powdered sugar, and vanilla extract until smooth and lump-free, then set aside.
- Butter one side of each bread slice so the surfaces that touch the pie iron will brown evenly.
- Place one bread slice, butter-side down, in the pie iron and spread with the cream cheese mixture to the edges.
- Top with strawberry pie filling and spread it into an even layer, leaving a small border for clean sealing.
- Cover with a second bread slice, butter-side up, and close the pie iron firmly.
- Cook over campfire coals for 3-4 minutes per side until the sandwich is golden brown and crispy, flipping once halfway through for even toasting.
- Carefully remove the pudgy pie from the pie iron and let it cool for 2 minutes to let the filling set slightly.
- Dust with powdered sugar and serve warm.